Showing posts with label Order Management. Show all posts

Thursday, October 31, 2013

Enabling Descriptive Flexfields

Descriptive Flexfields:

·        Descriptive flexfields lets you add additional fields to the form in order to track additional information needed by the business that would not be captured by the standard form. Descriptive flexfields can be context sensitive, where the information your application stores depends on other values your users enter in other parts of the form.

·        A descriptive flexfield appears on a form as a single–character, unnamed field enclosed in Square Brackets [ ]. Each field or segment in a descriptive flexfield has a prompt and can have a set of valid values 

Descriptive Flexfield Concepts:

·         Descriptive Flexfield Segments:

·         Descriptive flexfields have two different types of segments, global and context–sensitive.
·         A global segment is a segment that always appears in the descriptive flexfield pop–up window.
·         A context–sensitive segment is a segment that may or may not appear depending upon what other information is present in your form.
·         A descriptive flexfield can get context information from either a field somewhere on the form, or from a special field (a context field) inside the descriptive flexfield pop–up window. If the descriptive flexfield derives the context information from a form field (either displayed or hidden from users), that field is called a reference field for the descriptive flexfield.

·         How and where are the segment information is stored:

·         A descriptive flexfield uses columns that are added on to a database table. A descriptive flexfield requires one column for each possible segment and one additional column in which to store structure information (that is, the context value). The descriptive flexfield columns are usually named ATTRIBUTEn where n is a number.
·         For example, if you have a descriptive flexfield on an Shipping Execution (Delivery Details) form, it populates the Structure column with the context field and the columns ATTRIBUTEn with the flexfield segments of the table WSH_DELIVERY_DETAILS.

Example of enabling DFF:
  • Example :Enable DFF in Delivery Details form in Shipping transaction form
  • Navigation: Go to “Order management Super User, Vision Operations” responsibility
  • Orders, Returns >> Shipping Transactions Form
  • Enable the DFF at right bottom screen.
  • To know the name of the DFF in a particular form do the following
  • Navigation: Help Menu >> Diagnostics >> Examine
  • Select Block Name as $DESCRIPTIVE_FLEXFIELD$
  • Field as DLVB.DESC_FLEX
  • Value will be populated and it will be the title of your DFF.
  • Title: Additional Delivery Detail Information (Shipping Execution) 
  • Order management in the brackets represent the Application in which this DFF is registered. 


  •  To enable this 
  • Navigation: Go to Application Developer >> Flexfield >> Descriptive >> Register


  • Check for the Attributes created for the DFF segments 
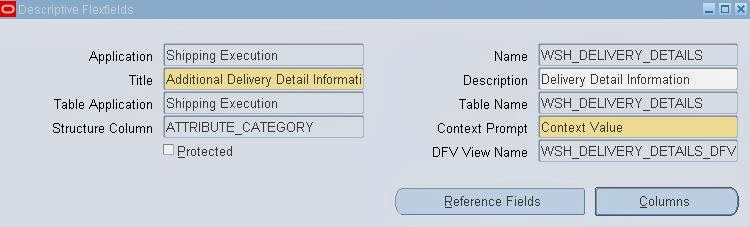


  • Navigation: Go to Application Developer >> Flexfield >> Descriptive >> Segments
  • Query the DFF 
  • Press F11 and enter
  • Title: Additional Delivery Detail Information
  • Application: Shipping Execution
  • Press CTL + F11 to query the record
  • Enter Context Field : LPN


  • Click on Segments
  • Enter the following information
  • Number: 10
  • Name LPN Demo
  • Window Prompt: LPN Demo
  • Column: ATTRIBUTE1
  • Save the record (CTL + S)


Click Open to View the segment Details
  • Press OK
  • You can assign any value set if you want, its optional so I am just leaving it as blank
  • Now check the “Freeze Flexfield Definition” Checkbox
  • Press OK
  • Now Click Compile button
  • Press OK
  • You will see the confirmation as shown above.
  • Now to go to Order management super User, Vision Operations” and open the Shipping Transactions form query for a LPN and click on DFF box in details.


  • You can hide the context field by un checking the Displayed Check Box in Context Field
  • To Make any changes you have to uncheck the “Freeze Flexfield Definition” Checkbox
  •          Press OK
  •          Now uncheck the Displayed Box in Context Field area as shown
  •          Save your Record
  •          Check the “Freeze Flexfield Definition” Checkbox
  •          Press OK
  •          Press Compile Button
  •          Press OK
  •          “Flexfield View Generator” concurrent program will be submitted. To see the status of the program go to      View Menu on top >> Requests >> Find
  •          Once you see the status as completed you can go to Order Management and check for your changes
  •         Now you should be able to hide the Context.


­

Tuesday, October 16, 2012

What is the Purpose of Internal Sales Order in OM ?


Why do we need Internal Requisitions and Internal Sales Orders?
Internal Requisitions (IR) and Internal Sales Orders (ISO) are used to transfer material from one inventory organization or warehouse to another, within the same company.

Why not use Inter Organization Transfer Feature?
IR and ISO provide us with a way to transfer material where we can introduce an approval mechanism for ordering material, and also track the transaction through documents. These features are not available in the Inter Organization Transfer utility.

The inventory organizations involved in the transaction may belong to the same Operating Unit or they may belong to different Operating Units.

The Data Flow for Internal orders


Why Back to Back Order or Drop-Shipment ?


Why Back to Back Order or Drop shipment ?

In B2B Order the shipment process is completed throu Order Management as a standard order after the item is received againts a Purchase order
Example: A order X from B
B Order Item X from C
C ship Item X to B
B Ships Item X to A
B bills A for the Order, C bills B for the order

Drop shipment is a method of order fulfillment where the organization taking the order may or may not maintain their own inventory for the drop shipped product, but fulfill their orders though 3rd party vendors who directly ship to the end customer ordering for the product.

Example:A orders item X from B
B orders Item X from C
C Shps Item X to A
B bills A for the Order, C bills B for the order

In B2B the source is Internal, the item would be procured after the order is created or after the demand is made
In Drop Ship the Source is External, inventory not effected Logial receiving, logical receiving is done against the ASN received from Supplier

B2B can be used across all showroom retailers and wholesale type of business to cater to challenge of maintaining stocks to handle unexpected large demands from certain customers where it is not in the best interest of such organizations to stock for them.

Drop Ship is suitable for agency typ eof business where companies book orders on behalf of other manufacturers and businesses not willing to do by themselves , also Suitable for MNCs which have a central warehouse design to meet customer demand over a large geographical area.

Monday, October 15, 2012

What does scheduling do?

Scheduling on order management 

1. Determines source (warehouse) for the sales order line based on the sourcing rules
2.It derives Schedule ship date, Schedule arrival date,  Delivery lead time and Shipping method.
3. Scheduling also set the VISIBLE_DEMAND_FLAG to Yes and makes order line visible to the planning applications .

We can schedule the line automatically by setting either of below options 

1. Setting Profile option - OM:AutoSchedule
2. Set the Autoscheduling check box while defining the Order Transaction type.
3. From Order UI , Sales order line Tools > Autoschedule.
4.Set scheduling Manually by 
Right click the line and then Select  progress Order.
Run Concurrent Program "Schedule Orders".
Use workflow to schedule line.
Select the Order line then Tools > Scheduling from Sales Order form

Thursday, September 27, 2012

Transaction Types in Order Management


Transaction Types

•          Transaction types are used to associate workflows for various phases of sales document processing.
•          The Define Transaction Types window is used to define both order and line types.
•          For order header the transaction type code will ORDER and for the lines it will be LINE.

Navigation : OM: Setup > Transactions >Transaction Types


Transaction Types – Assign Lines

•          Define your line types first. You should define line types for both order lines and return lines.
•          Once you define the Order Transaction types, assign the Line Transaction Type using the option Assign Line flows.


Document Sequences
•          Define Document Sequences for automatic or manual numbering of orders.
•          This step is required. You can define multiple document sequences that are assigned to different order types.

Navigation : OM: Setup -> Documents -> Define


Document Categories
Whenever we create a new transaction type, a new document category gets created automatically.
You must define a category for each bill of lading and packing slip you wish to create.

Navigation: OM: Setup -> Documents -> Categories

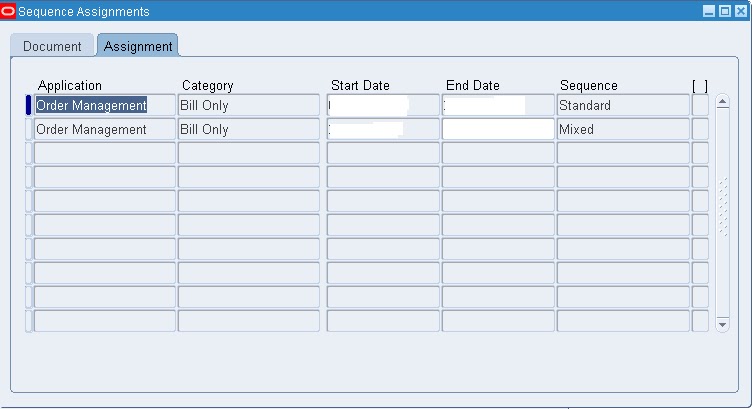
Assign document sequences
After defining document sequences and categories, assign document sequences to document categories.

Assigning sequences is application and category specific. You cannot change a document category definition. If you find incorrect information, create a new category with the correct information, re-assign document sequences to the new category, and disable the old category.

Navigation : OM: Setup -> Documents -> Assign


Tuesday, November 15, 2011

Order Management Setup Steps


Order Management Setup Steps
The implementation steps for Oracle Order -
1. Define multiple organizations in Oracle Inventory
2. Setup Multi-Org (Multiple Organization) Access Control Oracle Applications Multiple Organizations
3. Define key and descriptive flexfields
4. Define inventory organizations (warehouses), parameters, subinventories, and picking rules in Oracle Inventory
5. Define Profiles
6. Setting OM System Parameters
7. Define invoicing information
8. Define your sales representatives 
9. Define Tax Features
10. Define Quickcodes11. Define header and line processing flows
12. Define Document Sequences for Order Numbering
13. Define Order Import Sources
14. Define the units of measure
15. Define item information 
16. Define the items that you sell
17. Define the configurations that you sell
18. Define price lists Oracle Advanced Pricing
19. Define customer profile classes
20. Define information on your customers
21. Define item cross references current
22. Define your sourcing rules 
23. Define Order Management Transaction Types
24. Set up Cost of Goods Sold Accounting flexfield combination
25. Define Processing Constraints
26. Define Defaulting Rules
27. Define Credit Checking Rules
28. Define Automatic Holds
29. Define Attachments 
30. Define Freight and Special Charge Types
31. Define shipping parameters


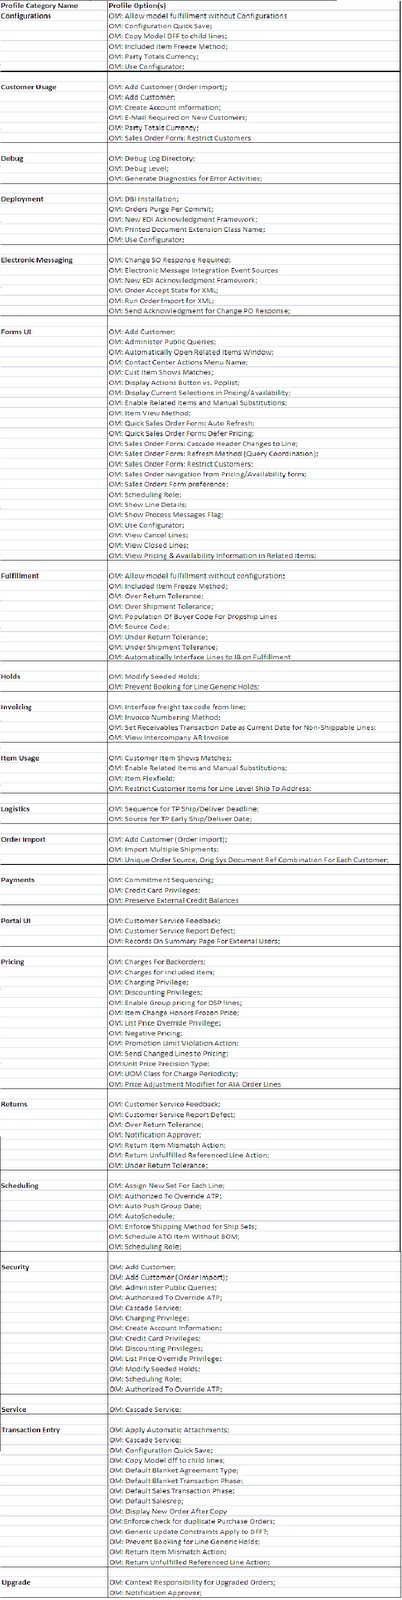
Profile Options for Order Management.In the below list not all are mandatory for set up .As per business requirement , one has to set up for the Profile Options values.


O2C Accounting


Monday, November 14, 2011

Drop Shipment Set ups and Flow


Drop Shipment Set ups and Flow:
A Drop Shipment is a process where items /deliverables are directly sourced and shipped to customers by Suppliers.


Drop Shipment - Setup
1. Item Attribute set ups:  
Purchased : Enabled
Purchasable : Enabled
Transactable : Enabled
Stockable : Optional
Reservable : Optional
Inventory Item : Optional
Customer Ordered : Enabled
Customer Order Enabled : Enabled
Internal Ordered : Disabled
OE Transactable : Enabled
Shippable : Optional
SO Source type  : External.


2.  Set up of Order Management Transaction Types to order and line workflows that support drop shipments.
3. Oracle Workflow Background Engine is running.
4. Define Drop ship locations used to perform drop shipments have the Ship To Site and Receiving Site.
5. Define the Internal Ship To Locations for your drop shipment customers (Oracle Receivables Standard Customer window, Business Purpose Details Tab).
6. Items have an associated List Price defined within your PO Inventory organization (Oracle Payables Financial Options window, Supplier-Purchasing Tab).
7. Items to be sourced in order management should have a price list assigned.


Drop Shipment - Process Steps
  1. Create a Quote with the customer and order type as quote , item and in shipping tab source type as External.
  2. Submit the Quote > Submit Draft > Quote status changes to ‘Pending Customer Acceptance’
  3. Go to Order Returns > Order Organizer find the quote and Click (T) Order Information > (ST) Main > Actions button > Customer Acceptance
  4. Enter the acceptance customer details and  Click (B) Customer Accepted.
  5. The status of the Quote Changes to ‘Entered’. The Quote has been converted to a Sale Order which is same as Quote number
  6. Book and Schedule the Sales Order - Status changes from Booked
  7. Click on ‘Progress Order’. Select ‘Purchase Release Eligible’, 
  8. Run Requisition Import Process - Purchase Release process - Orders, Returns > Purchase Release
  9. Run Requisition Import Process - Orders, Returns > Requisition Import
  10. Now the line status will be in Awaiting Receipt
  11. Login to the Receiving Organization (Purchasing) who has been setup as an Approver
  12. Create a Purchase Order from the Requisition through Auto Create
  13. Approve the PO
  14. Receive the full quantity
  15. Run Auto Invoice
  16. Verify Invoice in Sales Order


Thursday, November 10, 2011

Move Order Types


Types of Move Order:

1. Requisition Move Order
2. Replenishment Move Orders
3. Pickwave Move Orders 

Requisition Move Orders

are used to manually create requests to move material. These move orders may have multiple lines each for a separate item. If the move order requires approval, then it cannot be transacted unless the planner for the specific item approves it. To approve move orders we need some additional setups.
There is another step prior to transacting the Requisition Move Order. The material needs to be allocated. This means making an informed decision on which subinventory to source the material from and reserving it there. If picking rules have been set up in Oracle Inventory the allocation process will use these rules to determine the source subinventory.
Finally, the Requisition Move Order is ready for transacting. At this stage the user may choose to print a pick slip for the material handler to know where to get the material from.
 
Replenishment Move Orders
 are pre-approved move orders that are created automatically by Oracle Inventory. These move orders get created when there is a requirement for material and any of the following inventory replenishment methods are used:
Min-Max planning
Replenishment counting
Kanban replenishment
Now, since a move order is a tool for sourcing material within an inventory organization, Replenishment Move Orders are generated only when the material is sourced from another subinventory within the same inventory organization. For this the move order Source Type must be set as Subinventory. 

Pick Wave Move Orders
are used in Order Management. The Oracle Shipping Execution pick release process generates a Pick Wave Move Order to move the material from its source location to the Staging subinventory. In effect, this is a subinvenotry transfer through a pre-approved and ready to transact move order.

Picking Rules
Move Orders will use the Picking Rules set up in Oracle Inventory to locate the material required to fulfill the Move Order Line

Staging Locations
The default staging subinventory and locator to be used for all Pick Wave Move Orders are specified through Oracle Shipping Execution’s Shipping Parameters form.

Configuring Your Picking Process

You can now determine the number of pick release steps the system will prompt them to employ in order to move material from Pick Release to Ship Confirmation.

These steps are:

1. Pick Release
2. Move Order Line Allocating
3. Move Order Line Pick Confirmation
4. Ship Confirmation

Pick Release
Oracle Shipping Execution’s Pick Release process a creates Move Order. One Move Order line is generated for each order line included in the picking batch. That Move Order line will include the item, quantity, the staging location and a source subinventory and locator.

Allocating
The process by which the Picking Engine generates transaction line suggestions is called “Allocating”.

The allocating process for a Pick Wave Move Order Line also creates a high level @organization level Reservation for the items if no Reservations previously existed.

*Postponing the allocation process might be employed by organizations that pick release across multiple warehouses but prefer to allow each warehouse to determine when to release their order lines to the floor. Allocating the order lines immediately after they are created is called “auto-allocation”.

*Postponing the allocation process is referred to as “manual-allocation”. You can set up a default detailing mode in the Shipping Execution organization parameters. This default can be overridden at each Pick Release.

Pick Confirmation
The Move Order Line Details (transaction lines) created by the detailing process must be transacted to confirm the material drop-off in staging. This process is called Pick Confirmation. Pick confirmation executes the subinventory transfer that moves the material from its source location in the warehouse into the Staging location.

*Pick Confirmation automatically transfers the high level Reservation to a detailed Reservation (including lots, subinventory and locators) in the Staging location.

Ship Confirmation
The material picking process ends when the items are ship confirmed out of Inventory. Ship confirming the items removes the existing Reservations and performs the sales order issue transaction. In this case, the balance of the sales order may be backordered.

Importing Sales orders from excel

Importing Sales Orders From Excel

This article gives you simple steps to load large sales orders in Order Management using Excel Spreasheet.
We arrived at this solution using some good features available in Oracle Database and Oracle Applications. Here are the steps.
1. We create order header only (using sales order form) with all the necessary information like customer, order type, price list, sales person, sales credits, warehouse and the other values as deemed necessary.
2. Now we create line information in Excel worksheet (a template is created). We enter values for the fields like Item, quantity, price list name (if that is different from header), Line Type, Sales Person (different from header), any DFF segments, Shipping Instructions if any, warehouse name so on. We can have as many fields as that can fit in the order lines table. But instead of entering all the values, we use defaulting rules to default a lot of values from the header.
3. In this worksheet there is a simple marco written that we use to generate another worksheet in the same file for the entered rows.This macro does some basic validations on the information entered in the worksheet and generates the worksheet with this statement for each row.
4. insert into custom_lines_load_tbl  (column1,column2,….) values ( field1,field2,……)
5. Now using these rows with this statement (generated worksheet) we create a simple text file (copy and paste).
6. As a next step we upload this file as an attachment to the order header that we have created in the step number 1.
7. Now we run a custom program to create order lines into this order. This program takes order number as a parameter. This program reads the file contents line by line and executes the insert statements. This is the heart of the solution which is to read the contents of the file which is stored as LOB and executing the statements. After all the insert statements are executed successfully, the program calls oe_order_pub API to create order lines.
8. As you can see the program uses this feature : reading the file which is stored in the database as LOB line by line. Here is the code snippet to read the attached file stored as a file.
PROCEDURE parse_and_load_file (
      ERROR_CODE       OUT      VARCHAR2,
      retcode          OUT      NUMBER,
      p_order_number   IN       NUMBER
   )
   IS
      fil             BLOB;
      pos             INTEGER         := 0;
      amt             BINARY_INTEGER  := 32767;
      buf             RAW (2000);
      l_start         RAW (3000);
      l_end           RAW (3000);
      l_start_pos     INTEGER;
      l_length        INTEGER;
      nth             INTEGER         := 1;
      i               INTEGER         := 2;
      l_text          VARCHAR2 (4000);
      l_end_pos       INTEGER;
      l_plsql_block   VARCHAR2 (4000);
      k               INTEGER;
      l_write_buff    RAW (2000);
      l_text1         VARCHAR2 (4000);
      x_errbuf        VARCHAR2 (4000);
      x_retcode       NUMBER;
   BEGIN
      BEGIN
    begin
    delete custom_lines_upload_tbl
    where order_number=p_order_number
    and line_Id is null; –this is to make sure we do not load duplicate data
    exception when others then
    null;
    end;
SELECT file_data
  INTO fil
  FROM fnd_lobs
 WHERE file_id =
          (SELECT media_id
             FROM fnd_documents_vl
            WHERE document_id IN (
                     SELECT a.document_id
                       FROM fnd_attached_documents a, fnd_documents b
                      WHERE a.document_id = b.document_id
                        AND b.category_id =
                                     (SELECT category_id
                                        FROM fnd_document_categories_tl
                                       WHERE user_name = ‘Custom Lines Upload’)
                        AND entity_name = ‘OE_ORDER_HEADERS’
                        AND pk1_value = (SELECT header_id
                                           FROM oe_order_headers_all
                                          WHERE order_number = p_order_number)))
         FOR UPDATE;
      EXCEPTION
         WHEN OTHERS
         THEN
            debug_log
               (   ‘Order :’
                || p_order_number
                || ‘ does not have any file attached to it to load. Please attach the file and then try running this program’
               );
      END;
      k := DBMS_LOB.ISOPEN (fil);
      — debug_log(’Checking whether the file is already open’ ) ;
      IF k = 1
      THEN
         –debug_log(’file is already open. Closing it’ ) ;
         DBMS_LOB.CLOSE (fil);
      END IF;
      BEGIN
         –debug_log(’Opening the file’ ) ;
         DBMS_LOB.OPEN (fil, DBMS_LOB.lob_readonly ) ;
         k := DBMS_LOB.ISOPEN (fil);
      EXCEPTION
         WHEN OTHERS
         THEN
            debug_log
                    (’Exception occured in checking whether the file is open’ ) ;
      END;
      IF k = 1
      THEN
         LOOP
            l_start := UTL_RAW.cast_to_raw (’insert’);
            l_end := UTL_RAW.cast_to_raw ( ’;' ) ;
            l_start_pos := DBMS_LOB.INSTR (fil, l_start, 1, nth) ;
            pos := DBMS_LOB.INSTR (fil, l_end, 1, nth);
            buf := ”;
            –debug_log(’Start position is :’||l_start_pos);
            –debug_log(’End position is :’||pos);
            l_end_pos := (pos + 1) - (l_start_pos);
            –debug_log(’Length of the string is :’||l_end_pos);
            –debug_log(’Reading the file’);
            DBMS_LOB.READ (fil, l_end_pos, l_start_pos, buf);
            l_text := UTL_RAW.cast_to_varchar2 (buf);
            l_plsql_block :=
                  ‘begin’
               || fnd_global.NEWLINE ()
               || l_text
               || fnd_global.NEWLINE ()
               || ‘commit;’
               || fnd_global.NEWLINE ()
               || ‘exception when others then’
               || fnd_global.NEWLINE ()
               ||
                  –’debug_log(”Exception occured in processing the line”);’||fnd_global.NewLine()||
                  ‘NULL;’
               || fnd_global.NEWLINE ()
               || ‘end;’;
            –debug_log(’———————————————–’);
            –debug_log(l_plsql_block);
            –debug_log(’———————————————–’);
            BEGIN
            –Now execute the dynamic pl/sql block to insert rows into custom table from the file
               EXECUTE IMMEDIATE l_plsql_block;
            EXCEPTION
               WHEN OTHERS
               THEN
                  –debug_log(’Exception Occured’ ) ;
                  –debug_log(l_plsql_block);
                  –debug_log(’Exception is :’||substrb(sqlerrm, 1, 55) ) ;
                  NULL;
            END;
            nth := nth + 1;
         END LOOP;
         DBMS_LOB.CLOSE (fil) ;
      END IF;
      COMMIT;
   EXCEPTION
      WHEN NO_DATA_FOUND
      THEN
         k := NULL;
         k := DBMS_LOB.ISOPEN (fil) ;
         IF k = 1
         THEN
            DBMS_LOB.CLOSE (fil) ;
         END IF;
      WHEN OTHERS
      THEN
         BEGIN
            — debug_log(’End of File reached in Exception. Closing file’ ) ;
            k := NULL;
            k := DBMS_LOB.ISOPEN (fil) ;
            IF k = 1
            THEN
               DBMS_LOB.CLOSE (fil) ;
               COMMIT;
            END IF;
         END;
         – Here call the oe_order_pub API to create the lines passing the line table from this custom table.
   END parse_and_load_file;