Descriptive Flexfields:
·
Descriptive flexfields lets you
add additional fields to the form in order to track additional information
needed by the business that would not be captured by the standard form.
Descriptive flexfields can be context sensitive, where the information your application stores depends on other values your users enter in other
parts of the form.
·
A descriptive flexfield appears
on a form as a single–character, unnamed field enclosed in Square Brackets [ ].
Each field or segment in a descriptive flexfield has a prompt and can have a
set of valid values
Descriptive Flexfield Concepts:
·
Descriptive Flexfield Segments:
·
Descriptive flexfields have two
different types of segments, global and context–sensitive.
·
A global segment is a segment that always appears
in the descriptive flexfield pop–up window.
·
A context–sensitive segment is a segment that may
or may not appear depending upon what other information is present in your
form.
·
A descriptive flexfield can get
context information from either a field somewhere on the form, or from a
special field (a context field) inside the descriptive flexfield
pop–up window. If the descriptive flexfield derives the context information
from a form field (either displayed or hidden from users), that field is called
a reference field for the descriptive flexfield.
·
How and where are the segment
information is stored:
·
A descriptive flexfield uses
columns that are added on to a database table. A descriptive flexfield requires one column for each possible
segment and one additional column in which to store structure information (that
is, the context value). The descriptive flexfield columns are usually named
ATTRIBUTEn where n is a number.
·
For example, if you have a
descriptive flexfield on an Shipping Execution (Delivery Details) form, it
populates the Structure column with the context field and the columns
ATTRIBUTEn with the flexfield segments of the table WSH_DELIVERY_DETAILS.
Example of enabling DFF:
- Example :Enable DFF in Delivery Details form in Shipping transaction form
- Navigation: Go to “Order management Super User, Vision Operations” responsibility
- Orders, Returns >> Shipping Transactions Form
- Enable the DFF at right bottom screen.
- To know the name of the DFF in a particular form do the following
- Navigation: Help Menu >> Diagnostics >> Examine
- Select Block Name as $DESCRIPTIVE_FLEXFIELD$
- Field as DLVB.DESC_FLEX
- Value will be populated and it will be the title of your DFF.
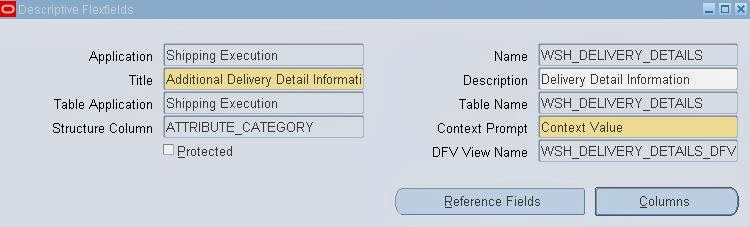
- Title: Additional Delivery Detail Information (Shipping Execution)
- Order management in the brackets represent the Application in which this DFF is registered.


- Navigation: Go to Application Developer >> Flexfield >> Descriptive >> Register

- Check for the Attributes created for the DFF segments

- Navigation: Go to Application Developer >> Flexfield >> Descriptive >> Segments
- Query the DFF
- Press F11 and enter
- Title: Additional Delivery Detail Information
- Application: Shipping Execution
- Press CTL + F11 to query the record
- Enter Context Field : LPN

- Click on Segments
- Enter the following information
- Number: 10
- Name LPN Demo
- Window Prompt: LPN Demo
- Column: ATTRIBUTE1
- Save the record (CTL + S)

Click Open to View the segment
Details

- Press OK
- You can assign any value set if you want, its optional so I am just leaving it as blank
- Now check the “Freeze Flexfield Definition” Checkbox
- Press OK
- Now Click Compile button
- Press OK
- You will see the confirmation as shown above.
- Now to go to Order management super User, Vision Operations” and open the Shipping Transactions form query for a LPN and click on DFF box in details.

- You can hide the context field by un checking the Displayed Check Box in Context Field
- To Make any changes you have to uncheck the “Freeze Flexfield Definition” Checkbox
- Press OK
- Now uncheck the Displayed Box in Context Field area as shown
- Save your Record
- Check the “Freeze Flexfield Definition” Checkbox
- Press OK
- Press Compile Button
- Press OK
- “Flexfield View Generator” concurrent program will be submitted. To see the status of the program go to View Menu on top >> Requests >> Find
- Once you see the status as completed you can go to Order Management and check for your changes
- Now you should be able to hide the Context.
No comments:
Post a Comment